Knowledge base
Lock Word document access with strong security to protect your IP
How to lock Word documents and secure your IP against theft and corruption with access restrictions, passwords, digital signatures and encryption

First published: 09-Jun-2020
Last updated: 25-Mar-2026
9 min read
Password protect Word document files to prevent theft, corruption and unauthorized changes. You’ve put a lot of time, thought and effort into producing your intellectual property (IP), so it’s prudent to take some simple measures to protect your Word document assets and stamp your ownership on them before somebody else does.
In a team environment where documents may have many contributors, it is wise to implement certain controls to ensure that documents are not lost, corrupted, destroyed or altered, either deliberately or unwittingly.
This post breaks down six methods that help to secure your intellectual property in minutes. Adding Word document protection provides these key benefits:
- Prevent unauthorized access and modifications to your sensitive documents, ensuring your work remains intact and under your control.
- Maintain professional credibility and legal standing by securing intellectual property and meeting compliance requirements in regulated industries.
- Enable safe collaboration by granting specific editing permissions to team members while protecting critical sections from accidental changes.
- 1. Where to find your Word document protection tools
- 2. Protect a Document by Marking it as Final
- 3. Protect a Document by Making it Read-Only
- 4. Password Protect a Word Document
- 5. How to Lock Word Document by Restricting Editing
- 6. Protect a Document With a Digital Signature
- 7. How to Remove Word Document Protection
- 8. Best Practices for Document Security
- 9. Troubleshooting Steps
- 10. Frequently Asked Questions
- 11. Key Takeaways
1. Where to find your Word document protection tools
The Backstage holds the key. This is where you can find a number of tools and different measures to protect your Word document.
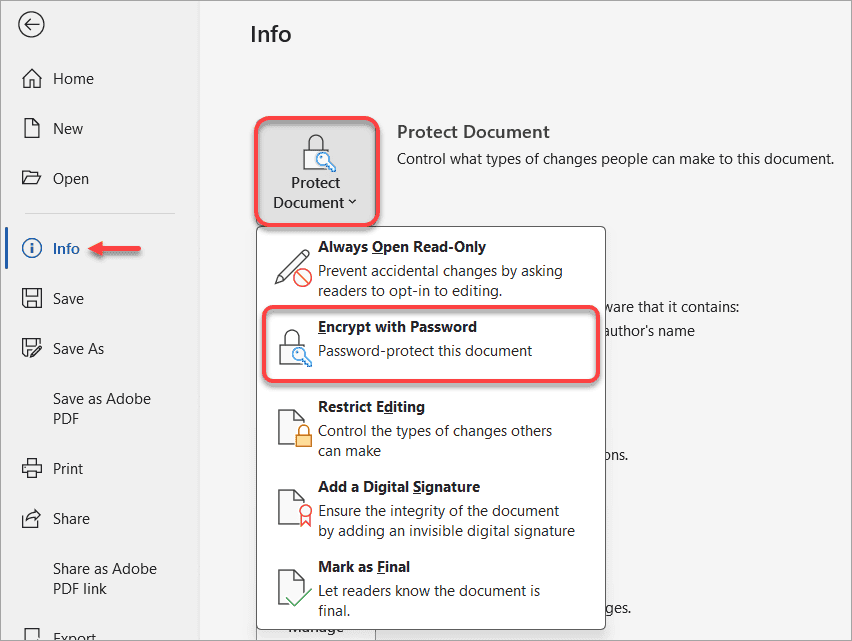
1Select the File tab.
2Click Info on the left side panel if necessary.
3Click the Protect Document button and select one or more of the options presented:
- Always Open Read-Only
- Encrypt with Password
- Restrict Editing
- Add a Digital Signature
- Mark as Final

2. Protect a Document by Marking it as Final
When a document is complete and you want to lock it down to prevent any further changes, the Mark as Final option will protect the document by making it read only.
Mark as Final is the minimum form of document protection and can be easily bypassed.
1Select the File tab and click Info on the left side panel if necessary.
2Click the Protect Document button.
3Select Mark as Final. A confirmation page is displayed.

If you are sure you want to proceed, click OK and a confirmation statement is displayed.

This is the weakest form of protection available. The next time the document is opened, a message in the status bar at the top of the screen states that the document is marked as final to ‘discourage’ further editing, but an ‘Edit Anyway’ button is provided which lets you bypass the restriction.

3. Protect a Document by Making it Read-Only
A simple way to protect your Word document is to only allow it to be opened but not modified.
1Select the File tab and click Info on the left side panel if necessary.
2Click the Protect Document button.
3Select Always Open Read-Only. The button changes color to show that the option is switched on. A message confirms this.

4. Password Protect a Word Document
A stronger form of Word document protection is to add a password and then only give the password to particular people.
When you encrypt a Word document, the software scrambles your content using complex algorithms. Without the correct password, the document appears as meaningless code.
Properly encrypted Word documents are extremely difficult to crack without the password. Ve selective in its use. It is best used for highly sensitive documents containing personal information, intellectual property, financial data, legal contracts or any confidential business materials.
1Select the File tab and click Info on the left side panel, if necessary.
2Click the Protect Document button.
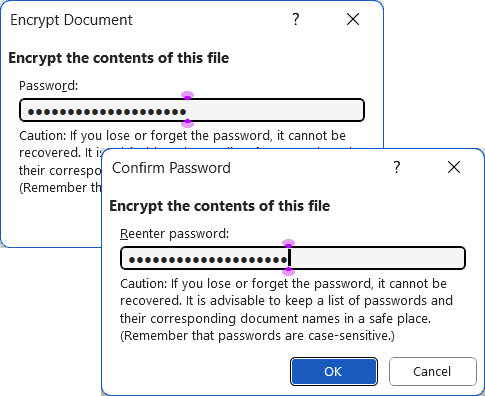
3Select Encrypt with Password to encrypt Word documents securely. The Encrypt Document dialog box is displayed.
4Type a secure password then press Enter.
5Confirm the password then press Enter again.
5. How to Lock Word Document by Restricting Editing
Rather than using blanket password protection, a more flexible way of allowing different people to work on the document but with particular restrictions applied is to use the Restrict Editing option.
1Select the File tab and click Info on the left side panel if necessary.
2Click the Protect Document button.
3Select Restrict Editing. The Restrict Editing sidebar is displayed where you can apply formatting or editing restrictions.

a) Formatting restrictions
1Under Formatting restrictions, tick the Limit formatting to a selection of styles box.
2Click the small blue Settings link just below the tick box. The Formatting Restrictions dialog box is displayed. All the styles available in the current document are listed. These include standard and custom styles.
3Tick the styles that you would like users to be able to use.
4Untick any styles that you do not want users to use.
5Tick Allow Autoformat to override formatting restrictions to allow the table styles to be used.

6Tick Block Theme or Scheme switching to restrict users to the current document theme, color scheme and font scheme settings.
7Tick Block Quick Style Set switching to restrict users to only being able to use the current Quick Style Set.
b) Editing restrictions
1Under Editing restrictions, tick the Allow only this type of editing in the document tick box. The drop-down box beneath the tick box is now active and an additional Exceptions (optional) section is displayed.
2In the drop-down box, choose Tracked changes, Comments or Filling in forms.

3For a blanket editing restriction, choose No changes (Read only).
For Read only and Comments, exceptions may be added for particular users or groups (to give them a free pass where everyone else is restricted). Exceptions apply to pre-selected portions of the document.
4Select the portion of the document for which the exception will apply.
5Select File > Info > Protect Document > Restrict Editing. Tick the Allow box under Editing restrictions and choose the type of editing from the dropdown list.
6Click More users…
7Type the user name(s), group name(s) or email(s) separated by semicolons.

Users and user groups are controlled by your IT administration. It works the same as the global address list in Outlook.
c) Activate the restrictions
1Click Yes, Start Enforcing Protection in section 3 of the Restrict Editing sidebar.
2Enter and re-enter a password, then press Enter to prevent anybody who is not privy to the password from changing the editing and formatting restrictions.

Restricted regions for a user will be highlighted and shown in square brackets.

d) Revoke user access
To revoke access for a user or group, e.g. if they leave the team or employer:
1Click the drop-down arrow next to the user/group name.
2Choose Remove all editing permissions for this user.
For a user to find what parts of the document they can access:
3Select the File tab and click Info on the left side panel if necessary.
4Click the Protect Document button.
5Select Restrict Editing.
6On the Restrict Editing sidebar, click the drop-down arrow next to the user name listed under Exceptions.
7Choose one of the three options offered (shown here on right).

6. Protect a Document With a Digital Signature
Digital signatures have been around for several years. They must be purchased from a verified Microsoft partner, but they serve a number of useful functions:
- Digitally sign and seal documents directly within Word, Excel, Outlook or SharePoint.
- Speed up signature-dependent processes and reduce paper-related costs.
- Validate your identity with verified credentials.
- Use any computer, tablet or mobile device for flexible signing.
- Create legally enforceable signatures that are easily verifiable.
- Maintain proof of signer identity and document integrity.
- Comply with strict industry and government regulations for secure documentation.
To get a digital signature for a document:
1Select the File tab and click Info on the left side panel if necessary.
2Click the Protect Document icon.
3Select Add a Digital Signature.
4A message pops up asking if you would like to get a digital signature from a verified Microsoft partner.
5Choose Yes. Word will then open a browser window and take you to a page on the Microsoft website listing the services of some reputable digital signature providers.

6Click the links, read the info and choose a provider.
7. How to Remove Word Document Protection
If you need to remove protection from a Word document, the process varies depending on which protection method was applied.
a) Remove Mark as Final protection
1Open the document and click the Edit Anyway button in the status bar at the top of the screen.
Alternatively, go to File > Info > Protect Document and deselect Mark as Final.
b) Remove read-only protection
1Select File > Info.
2Click Protect Document.
3Click Always Open Read-Only to toggle it off.
c) Remove password protection
1Open the document and enter the password when prompted.
2Select File > Info > Protect Document.
3Click Encrypt with Password.
4Delete the password from the dialog box and click OK.
d) Remove editing restrictions
1Select File > Info > Protect Document > Restrict Editing.
2At the bottom of the Restrict Editing sidebar, click Stop Protection.
3Enter the password if prompted, then click OK.
8. Best Practices for Document Security
To maximize Word document protection, consider these best practices:
a) Use strong passwords
When you password protect Word document files, create passwords that combine uppercase and lowercase letters, numbers and special characters. Avoid using easily guessable information like names, dates or common words. Longer passwords (12+ characters) provide stronger security.
b) Layer multiple protection methods
For sensitive documents, combine protection methods. For example, use password encryption together with editing restrictions to create multiple security barriers. This approach ensures that even if one protection layer is bypassed, others remain in place.
c) Keep backup copies
Always maintain unprotected backup copies of your documents in a secure location. If you forget a password or need to modify protection settings, you’ll have access to the original content. Store these backups separately from the protected versions.
d) Document your protection settings
Keep a secure record of which documents are protected, what protection methods you used and who has access. This documentation helps with password management and ensures continuity if multiple team members need to manage protected documents.
9. Troubleshooting Steps
10. Frequently Asked Questions
11. Key Takeaways
- Access the Backstage by clicking the File tab to find comprehensive document protection options in Microsoft Word.
- Password protect Word document files using five methods: opening as read-only, marking as final, encrypting with a password, restricting editing or adding a digital signature.
- Encrypt with Password offers the strongest security, using military-grade AES 256-bit encryption to prevent unauthorized access.
- Restrict Editing provides flexible control, allowing you to specify which users can modify particular sections while protecting other areas.
- Layer multiple protection methods for sensitive documents and always maintain secure backup copies with documented password records.
I hope this has opened your eyes, given you a few ideas and made you aware of how vulnerable you could be, but also given you hope and some measures you can take to protect yourself.
Shhh! Keep this to yourself but Jason is the guy they sneak in the back door to fix Microsoft 365 disasters when all else has failed. He's quite the straight shooter, breaking things down into simple steps and giving you advice you can actually use.
Yes, he takes on client projects and 1:1 troubleshooting so if you would like to finally get that project finished - you know the one - then go ahead - just reach out.


2 responses to “Lock Word document access with strong security to protect your IP”
Hi there. I like this article very much – clear, good language, no ambiguity, well formatted, comprehensive. I was hitherto entirely unaware of the ability to restrict editing, particularly with respect to styles – that’s the single biggest take-away for me. I am intrigued to learn that digital signature have to be purchased, because they’re already included in Acrobat. Again, thanks for this quality article.
Thanks Jonathan. It sounds like time well spent!